After using the web form to create your new signature, follow these steps to copy and paste it into Outlook Web Access (OWA). These steps vary slightly as Microsoft makes changes to their OWA client.
How to tell which version of OWA you have?
- In OWA 2010, the word “Options” and a question mark will appear under your name in the upper right-hand corner.
- In OWA 2013, there will be a gear symbol and a question mark to the right of your name in the upper right-hand corner.
Instructions for Outlook Web Access (OWA)
- Login to OWA (moblie.johnshopkins.edu) and open the message that was sent to you containing your new signature by double-clicking it.
- Right-click on the signature.html file attachment in the message and choose "Save target ass..." or "Save link as..." (depending on which browser you are using).
- Select "Desktop" in the navigation pane on the left and click the Save button.
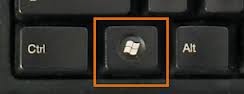
- Press and hold the Windows key while pressing E which will launch Windows Explorer. (Where is the Windows key?)
- Select "Desktop" in the navigation pane on the left and find the signature.html file in the pane on the right.
- Double-click on the signature.html file to open it in a browser.
- Press Ctrl-A to select all of your signature text.
- Press Ctrl-C to copy it to your clipboard.
- Go back to your OWA main window where your Inbox messages are listed.
- For OWA 2010 only: Back in the OWA main window, click Options menu below your name and select See All Options…
- For OWA 2013 only: Back in the OWA main window, click the gear symbol to the right of your name and then select Options from the menu.
- Click the settings menu option on the left.
- Click the mouse inside the box for your E-Mail Signature.
- If you have an existing signature in this box, press Ctrl-A to select your entire existing signature.
- Press Ctrl-V to paste your new signature.
- You may make any necessary changes to your signature at this point as long as they comply with MarCom’s standards. Note you should not make changes here to your e-mail address or URL (if you have one) because that will alter the approved color and size for these links. If you need to make changes to your e-mail address or URL, please go back to the signature creation web page, make the changes there and send yourself an updated signature. If you accidentally change one of these elements and their appearance changes, you can undo recent changes by pressing Ctrl-Z as needed.
- Select the check box next to “Automatically include my signature on messages I send.”
- Click the Save button at the bottom of the page.
- You can now close the browser or click your browser’s back button return to your e-mail Inbox.